Did you all see that sweet finish last week by Paula of The Sassy Quilter? I remember admiring this as a
completed top back in October. Paula shares a link to her design wall tutorial in that post. It was her
design wall tutorial that inspired me to put up one of my own. Thank you, Paula!!!
 |
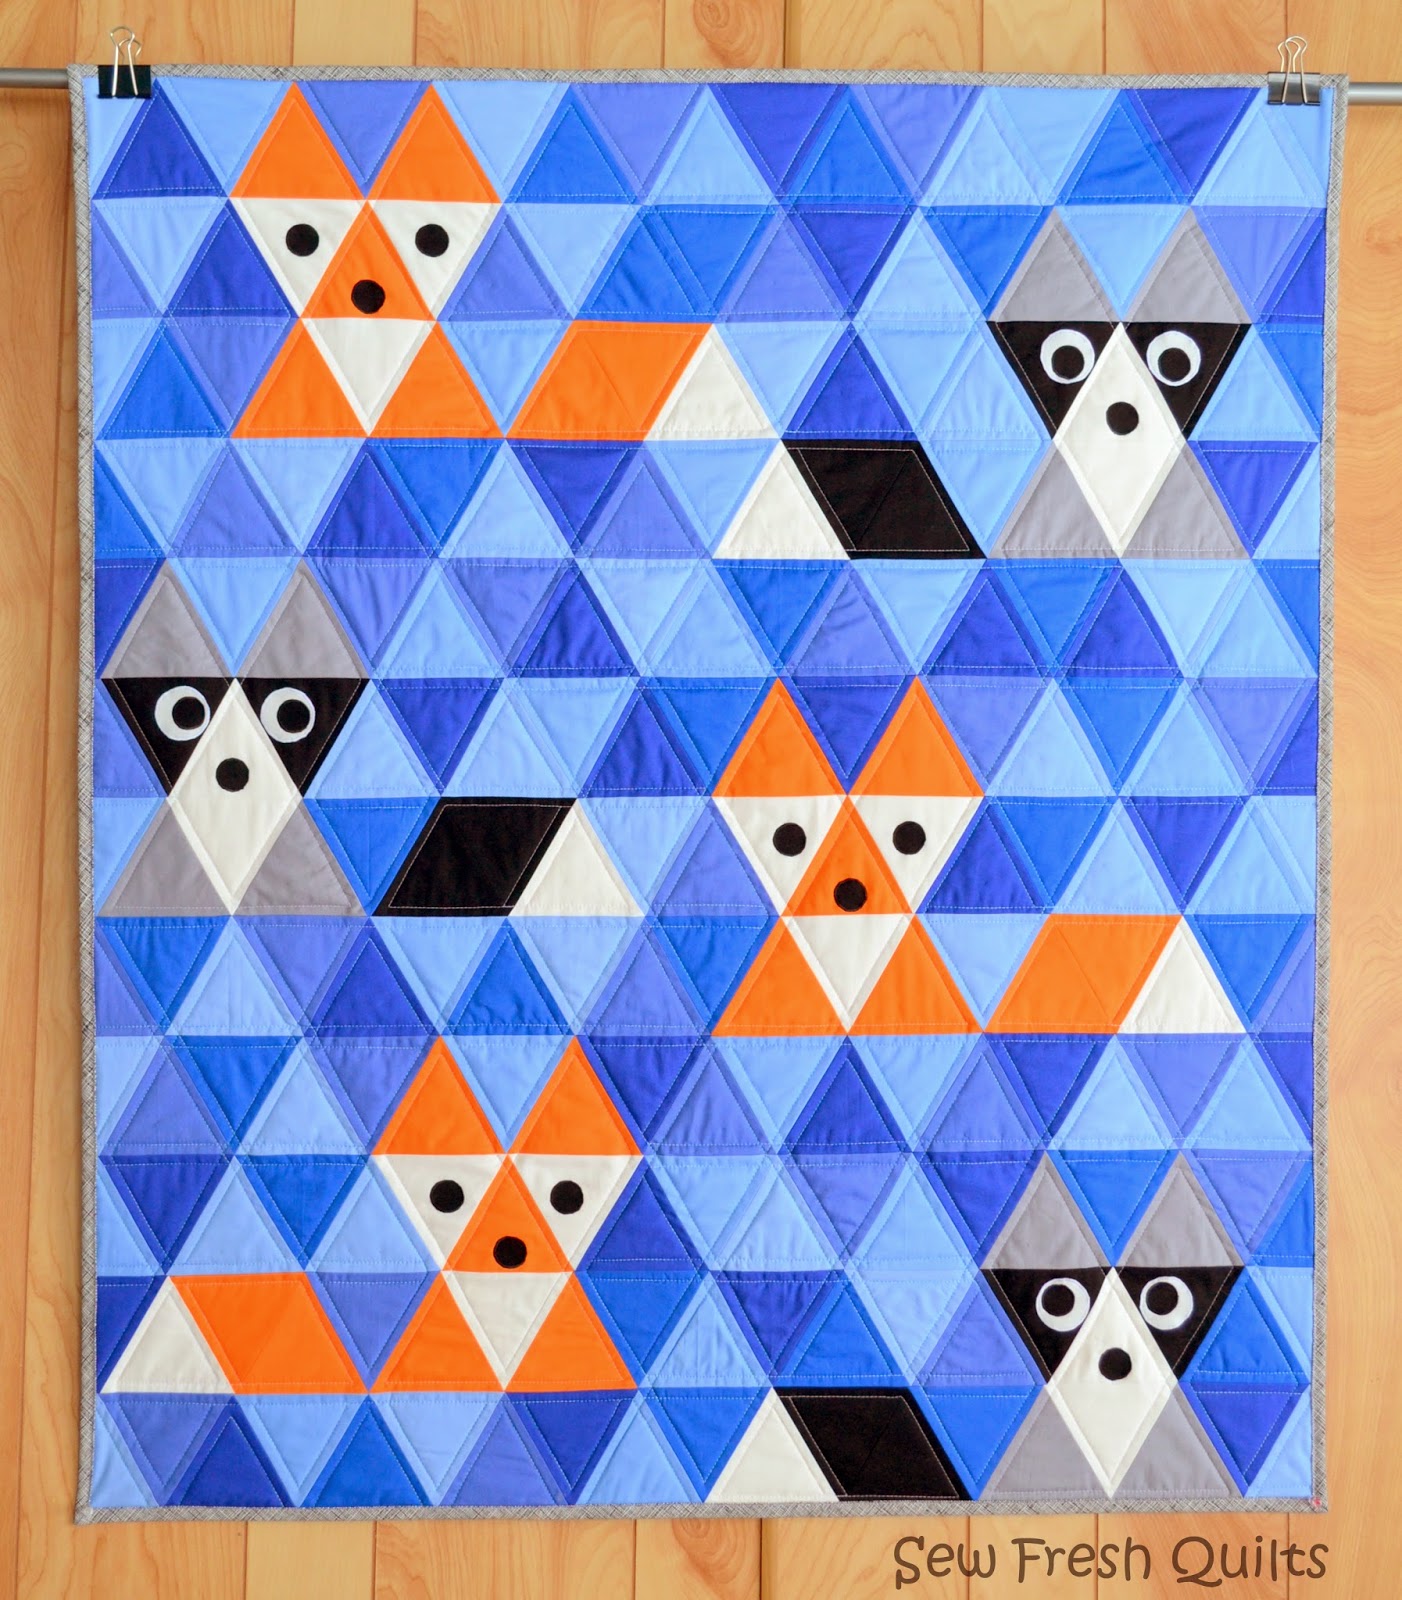
| Equilateral Triangle Quilt |
Now that I have tackled and overcome the whole hexagon, I thought it was time to take on the Equilateral Triangle. And while I am at it, I thought it would be fun to share my experience with a tutorial.
The sides of an Equilateral Triangle are all equal in length. Hence the name. And this type of triangle also has 60-degree angles at each corner.
So how do you cut Equilateral Triangles? First thing you need to know is what size are you making.
If you know how long the sides of your triangle are going to be, you then need to determine the height of your triangle. To do this, I used this handy
online calculator.
I wanted my FINISHED triangles to measure 4.25" along the sides. Or side 'a' as seen in this diagram. Using the calculator, the height is then determined to be 3.68"
The height measurement then needs to be increased by 3/4".
That total will give you the measurement of your fabric strip width.
3.68" + .75" = 4.43"
This is just under 4.5" and so that is the width I cut the strips.
Not terribly accurate.
I used two similar methods to cut the strips into the triangles needed for the quilt layout. The first example is cut from WOF (width of fabric) strips measuring between 40" to 44".
Using this method, your fabric strip is folded in half, and you will be cutting through two layers of fabric at one time. The fold in this picture is on the left, under the acrylic ruler. Place the 60 degree line of your ruler on the bottom edge of your fabric strip. The top of your fold will line up with the edge of your ruler. Use your rotary cutter to slice off this triangular piece. The cut will provide you with a single folded equilateral triangle.
Now place the 60 degree line of your ruler on the top edge of your fabric strip. The bottom of your strip will line up with the edge of your ruler at the point where it was cut. Use your rotary cutter to slice off these triangular pieces. This cut will provide you with two equilateral triangles.
Place the 60 degree line of your ruler on the bottom edge of your fabric strip. The top of your strip will line up with the edge of your ruler at the point where it was last cut. Use your rotary cutter to slice off these triangular pieces. This cut will provide you with two more equilateral triangles.
Continue in this manner until you can no longer cut any whole triangles from the strip.
The second example is cut from strips of a fat quarter width measuring between 18" to 22".
Using this method, your fabric strip is NOT folded in half, but two strips are stacked on top of each other, and
you will still be cutting through two layers of fabric at one time. Place the 60 degree line of your acrylic ruler on the bottom edge of your fabric
strip. I left a little more than 1/4" to the right of the ruler's edge to allow for half triangles that will be used along the sides of the quilt. Use your rotary
cutter to slice off these triangular pieces. This cut will provide you
with two partial equilateral triangles.
Now swing the ruler a little clockwise and place the 60 degree line on the bottom edge of your fabric
strip. The top of your strip will line up with the edge of your ruler at the point where it was last cut.
Use your rotary
cutter to slice off these triangular pieces. This cut will provide you
with two whole equilateral triangles.
Now swing the ruler back counter clockwise and place the 60 degree line on the bottom edge of your fabric
strip. The bottom of your strip will line up with the edge of your ruler at the point where it was last cut.
Use your rotary
cutter to slice off these triangular pieces. This cut will provide you
with two more whole equilateral triangles.
Continue swinging your ruler back and forth as you continue down the strip until you can no longer cut any whole triangles from the strip. I was provided with two more partial equilateral triangles at the end.
When you have determined how many equilateral triangles you can get from each strip, you will be able to determine how many strips you need to cut, using either method.
******Edited to add*******
Be careful to keep your triangles piled with the fabric grain running in the same direction. When cutting the triangles from your fabrics strips, the straight of grain is running perpendicular to the top and bottom edges of your strip, and your cuts are on the bias. You want to keep your strip edge, the cross grain, as the bottom of your triangles when piling. The fabric will stretch along the bias sides.
************************************************************************
Click
here for the Equilateral Triangle piecing tutorial...
************************************************************************
Edited to add.....
I now have two patterns for sale which use equilateral triangles.
The first is the Fox & Friends triangle quilt
for sale here.
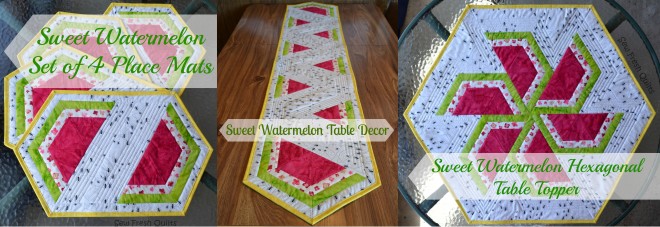
The second is this full set of Watermelon Table Decor
for sale here.
Keep On Quilting On!


27 comments:
Love the layout and colors Lorna!
After seeing Paula's post I added a triangle quilt to my wish list! Can't wait to see how yours turns out.
those are little foxes I see, if I'm not mistaken! too cute, Lorna!
:) Kelly @ My Quilt Infatuation
I so love triangle quilts! Can't wait to see how you quilt it.
Thanks for the shout out! I love the colors you are using. This is going to look great!
I see gray kitty cats! But Kelly pointed out the foxes, and now I see them too. This is sew much fun. Great tut!
Love the Triangle Lorna. Have been checking out the Go cutters. They look great!
Love the quilt! The colours are great. Excellent explanation on the triangles too.
You are on roll and you are going to get even more effective with that wall!
Nice tute! I made a mini equilateral quilt last year to try my hand at it and loved it. I want to do a bigger one one of these days.
Love your design wall too. I made one last year on insulating foam so I could move it around in my small space. It has been such a huge help.
Some day I want a Go Baby. I can see how easy it would be to use.
Your posts are so informational. Keep up the great work.
I love these little furry friends!
The quilt is darling. Are you going to add eyes and noses to the foxes and raccoons? I would also add that there are some special triangle rulers which are helpful.
Love the layout of the triangles. I really want to try this, love the orange added in for that splash of excitement!
I'm loving triangle quilts! And your little foxes are so cute!
What a fun design! I love triangle quilts! Yours is going to look amazing! :)
-Lindsey
Fort Worth Fabric Studio Blog
Inspiring Creations Blog
Great tutorial Lorna. I love the colors you are using for your quilt. coincidentally I just started a triangle quilt last Sunday, but I'm using one of those triangle rulers.
Great tutorial! And I love your colors you are using, you have such a talent for putting color schemes together!
What a great tutorial showing how to cut the triangles without a special template!! I just got the AccuQuilt Go Equilateral Triangle die and love it!
I have been putting off piecing my triangles so your how-to could not have come at a better time. I'll be back to check it out! :)
Love the colors you chose!! And that die is on my list too!
Great tutorial and love your fabrics combo.Your quilt will be fabulous!!
I recently started using 60 degree triangles and it opens up a whole new avenue for design!
love the colors. Nice bright contrast on a cold winter's day. Can't wait to see it all done.
Hi Lorna, looking forward to seeing your progress on that one. Great colour combo!
I'm looking forward to how to assemble this! I can cut, but those partial seams are where I need practice : )
Thanks so much for this tutorial I haven't tackled many triangle designs yet. This is really helpful.
Interesting quilt indeed! I live in Europe and getting good sold cottons for quilting is a challenge.I would love to know what colors you chose for this quilt.Did you use the Kona Solid cotton range? The tutorial is very helpful. You have great taste and a cheeky sense of humor (those cute foxes).
Post a Comment